Sorry. I managed to create two pages with the same filename, and didn't realize mistake until the same URL was present in many forums... relating to two different stories. Sigh.
If you have come here to learn about cables, etc, for connecting an Arduino to a big PC, you have come to the right place!! Skip over the next paragraph, and welcome to the information you came for.
If you were looking for my challenge to the hobbyists out there for a ethernet connection between an Arduino and a PC elsewhere on the LAN, then I have to ask you to click this link for the LAN connection challenge. Sorry!
See my page promoting the Arduino if you want to know about the Arduino in general. The page you are reading is just about a detail of What You Need. At the promotion page there are also links to my pages about the "Basic Stamp" and various PIC based kits. The Arduino is my current favorite microcontroller for hobbyists... after years of trying various alternatives!
To program your Arduino, you need a way for your big computer to talk to the Arduino. The free development software for your big computer sends the program out via one of the usual comm ports. As USB devices are so user friendly, I've been using a USB solution....
Physically, I plug in a USB device. My computer then cleverly hooks everything up as if, "virtually", I have added a serial port to my PC!! Complicated to use, or to fully understand... but it Does Just Work. (With one or two little setup "features"... but, hey... it's a computer!)
Much of what you read on the net speaks of Arduinos and clones connected "by USB". They will usually be connected as described in the previous paragraph.
To do those clever things takes some clever circuitry. There are two ways to equip yourself with that.
Some Arduinos and clones have built in USB circuits. For those Arduinos, the only other thing you need is a plain USB cable, the sort you probably already have. For many people, I think this is a silly "solution". (For the rest of this page, assume "... and clones" whenever I say "Arduinos".) Why have those expensive circuits on the Arduino board? Unless your Arduino is going to be doing a job that uses those circuits for more than the programming of the Arduino (few jobs will be doing this), it seems inefficient to put the USB circuits on the Arduino board.
Happily, there are at least two alternatives....
1) A fancy cable, that looks like a USB cable, but has some electronics hidden inside it, or....
2) A simple little PCB with an ordinary USB socket on one end and a socket on the other to connect to your Arduino. Once you plug this onto the end of an ordinary USB cable, you have the equivalent of one of the "fancy cables".
While I must admit I haven't (yet!) tried one, the simple little PCB looks like "the way to go". From things I've read, I learn that....
I'll say it again: Plug the Simple Little Board onto a USB cable, wrap it up with electrical tape, if you like, and you've got yourself the equivalent of the Fancy Cable.
So... where do you get the Simple Little Board, and what is its proper name?
It is called the "BUB". ModernDevice have published a good blurb on the BUB, and the sell it as a "kit", without USB cable (you probably have one!) for $14 + p&p (at 2/2010). Add $2.50 if you want a cable, just to be on the safe side.
I put "kit" in quotes a moment ago because for your $14, you get a mostly assembled BUB. As there are a few choices that you will make that affect what connectors, etc, are needed, a little bit of final assembly is up to you. (That's a small price to pay for a device that is more flexible than the Fancy Cable.)
Another source of the BUB is Wulfden. I've had good service from both sources. Which you buy from is most likely to be determined by what other "goodies" you want to pick up in the same order. Wulfden has some superb little proto-typing boards at a Very Good Price, and a kit to decode DTMF signals.. the audio tones used by the phone system. I don't think that Blue Boxes work any more, but what about using your cell-phone (or other) to "feed" a microphone connected to the DTMF connected to an Arduino? (Instead of a keypad.) (See Ashish Derhgawen's Cell Phone Access Controller, for instance.)
A few details: One of the connector sockets is la belled "3V3". If you go to plug a BUB into an Ethernet Pro (EP) from Sparkfun, you may notice that, according to the silkscreen legends on the two devices, you are about to short the BUB's 3v3 to the EP's ground line. Not a good idea!! (The BUB is supplying 3v3, in case you need it. (It can deliver up to 50mA, I think the current rating reads.) However! If you look closely on the underside of the BUB, you will quite possibly find that there is no connection between the BUB's 3v3 and the connector which the EP plugs into. There's a way to MAKE a link, to pass that 3v3 onward... but it may well be UNmade on your board. And it if isn't, it can easily be changed to that state, if you want to use a BUB with an EP, which, at least in the case of the one I purchased in September 2011, is a 5v device.
FURTHER notes on the BUB with the EP... or with any device using an Arduino or clone with the "Optiboot loader". (Happily, this doesn't have terrible consequences for continuing use of the BUB with other devices.
I used a BUB for many months, if not years, with no jumper either way at the BUB's "LOGIC LVL" select pads. The ModernDevice site has a nice, prominent notice for users explaining that with Optiboot you can't be so casual. You have to make the link, one way or the other. As all the devices I use are 5v devices, I simply soldered a wire in place. However, if you use 5v and 3v3 devices, you can put three pins in the LOGIC LVL holes, and use an ordinary "feature select" push on connector to have easy switching between modes.
So. Enough about the BUB. Turning to the "traditional" answer, widely used before BUB came along... The "Fancy Cable". (That section is short. See also the "Whichever you use" material beyond it.)
The cable is produced by FTDI. It is worth asking whomever you plan to buy your Arduino from if they can supply the cable... their availability seems to come and go. Alternatives also seem to be appearing. At 1/2010, I found the cable available from www.adafruit.com, an established seller of Arduinos. At that time, they cost US$20, + p&p which was reasonable to US destinations, and about $12 to overseas destinations. But! N.B.: At 2/2010, it was no longer there, and also, at 1/2010, Adafruit was only selling the 3.3v version of the cable. I believe that is less than ideal for programming 5v Arduinos and clones... if it will work at all. (A post at the Arduino forum by someone I know to be reliable and informed suggested that people with the 3.3v cable wanting to program 5v Arduinos should employ extra circuitry.)
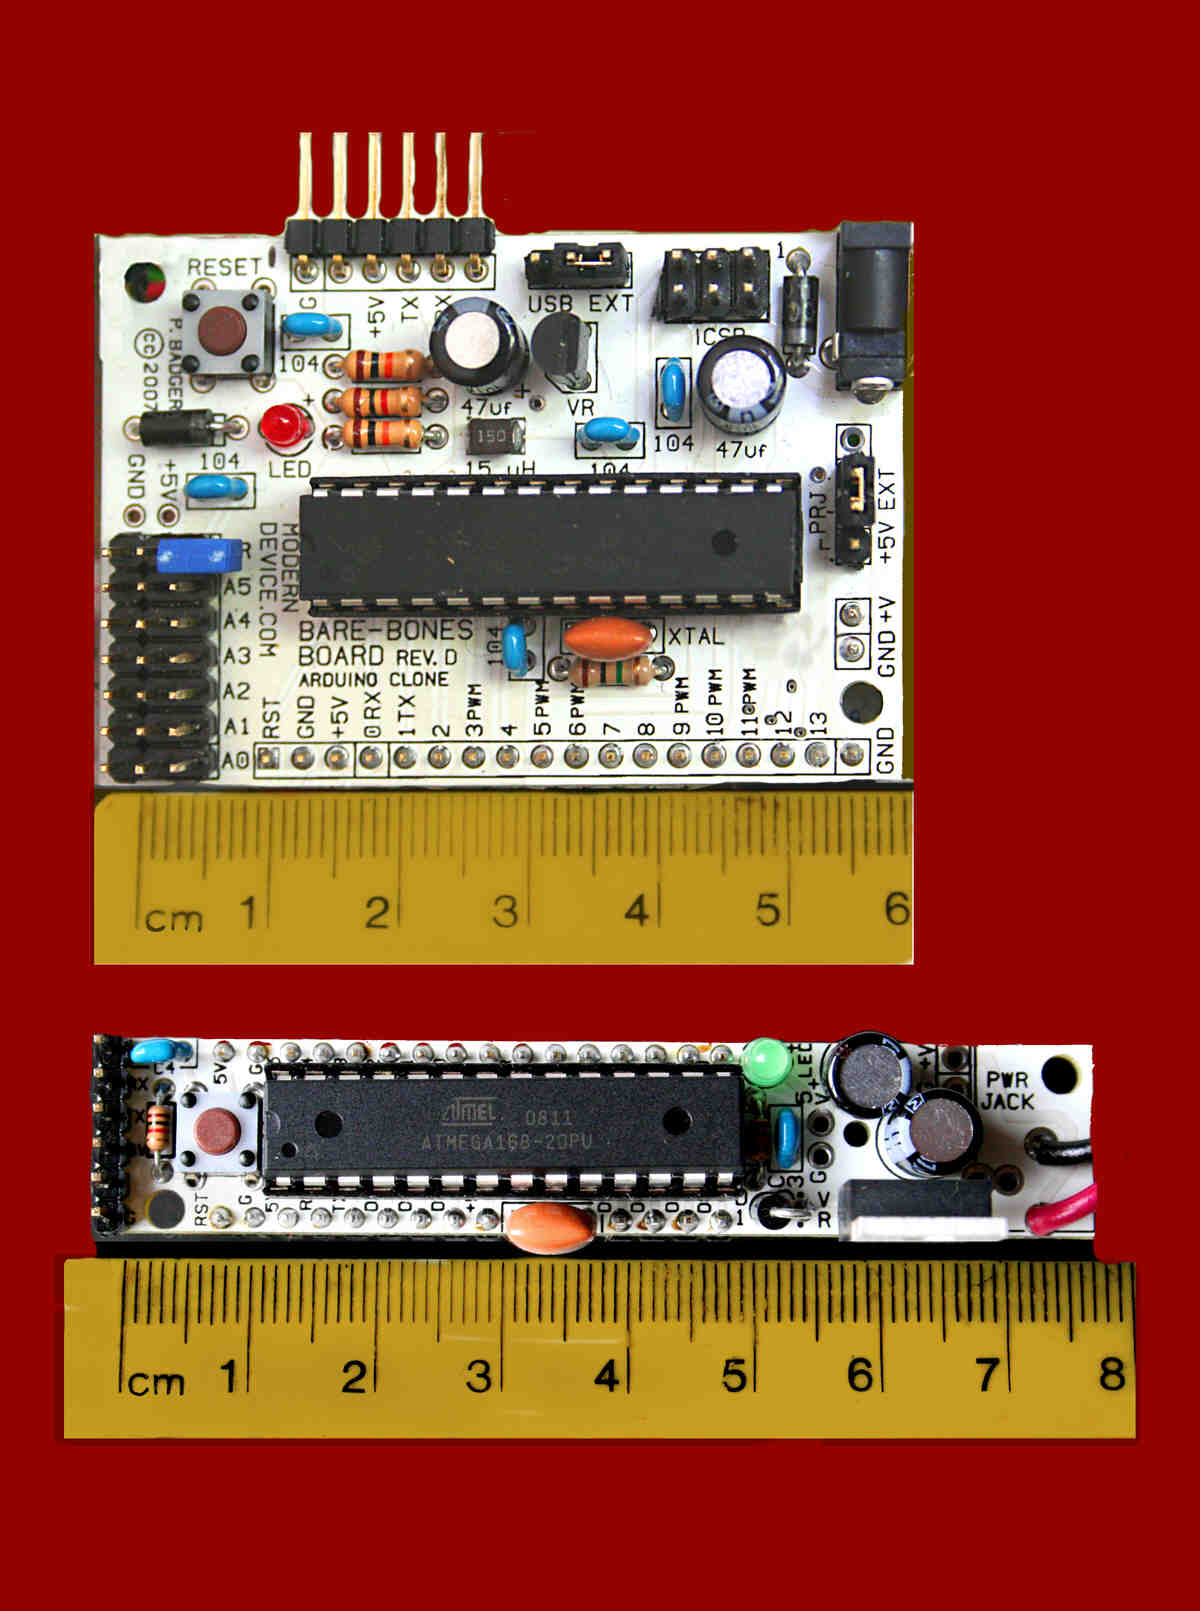
Nota Bene: Look at the six pins on the top edge of the top board in the picture. (The equivalent pins are at the left end of the lower board.) This is where you connect the BUB or fancy cable.
Next to one of the pins, there is a tiny "G" on the board, for GROUND. The Fancy Cable has a black wire at one end, and a GREEN wire at the other. The black wire on the USB cable goes on the "G" pin of the RBBB. It would be easy to connect spin the connector 180 degrees, connect "G to Green"... but NOT A GOOD IDEA!!!
![]() Page tested for compliance with INDUSTRY (not MS-only) standards, using the free, publicly accessible validator at validator.w3.org
Page tested for compliance with INDUSTRY (not MS-only) standards, using the free, publicly accessible validator at validator.w3.org
....... P a g e . . . E n d s .....