 Bookmark this on Delicious
 Recommend to StumbleUpon
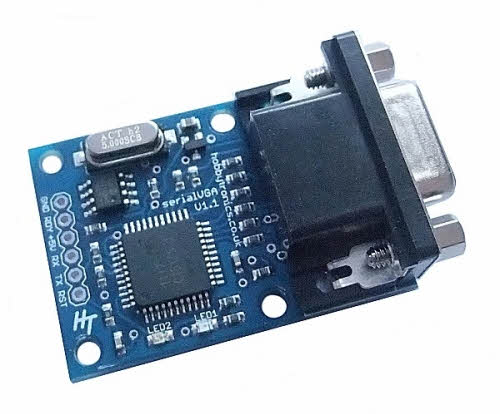
Just too cool! The Hobbytronics.co.uk product code "SerialVGA", a small circuit to interface between any source of TTL serial data and an ordinary VGA monitor! Fifty lines of 100 characters... very easily. Multiple windows (with built in line-wrapping and scrolling): Quite easy. And yes, you can have colors.
(5v Arduinos and Teensys "do" "TTL serial data" with VERY little fuss or bother. Those of you in the 3v3 world are also welcome at the party... details at the bottom.)
The Hobbytronics site will tell you all the Good Stuff...
Here, I am just going to try to help you past a few Newbie Gotchas.
Don't think for a moment that I am explaining all that the board can do!
And apologies for the crude page. I shouldn't be "playing" with this today. Would you rather no page, if it means waiting until it can be "pretty"?
===
First catch your circuit. £25 was all it took, including VAT, p&p, everything, November 2014.
Solder three wires to it. There's an an excellent downloadable manual (.pdf format), with a good diagram. The hardware element is nearly trivial. The manual also covers the software commands the board accepts.
The red wire goes to a source of 5v. The black wire goes to 0v, aka "ground", and the green wire goes to the serial OUTPUT your microprocessor is going to send serial data over. (See below, before connecting that one.)
The software is almost merely....
void setup()
{
  mySerial.begin(9600); // Set baud rate for serialVGA board
}

void loop()
{
    mySerial.print("Hello world. ");
    delay(150);//Just to make it easy to se what is happening.
}
... but you do have to set up the mySerial object. Not rocket science. But other than that, the above will work. You don't need to know about the "commands" the SerialVGA module accepts. To get started. To use it crudely. (When you do get on to using commands, there's one that, mid November 2014, was not yet available... but might become available before long: A command to tell the SerialVGA to put the version of the firmware in it on the display.) (Please let me know, if you find that one has been created?)
The code below goes into all the details. It also adds one frill: the sending of the device's "reset me" code, so that you can start with a clean screen each time you restart your Arduino (or other source of "what I want" data.)
Whether you are using an Arduino, or Teensy, or other microprocessor, don't worry about "the other half" of any serial port you may have available. In simple use, the SerialToVGA board only needs your microprocessor to have a single line, a serial output (from the microprocessor) to feed the input of the SerialToVGA board. (Don't, at this stage, be distracted by the extra bits, the clever bits you can do to marry not only the VGA output, but also a keyboard for input to the microprocessor. That's not core to what the SerialToVGA does, although there are ways you can have a keyboard working along side it.)
With an Arduino, I suggest you use NewSoftSerial, and set up a dedicated port for the SeralToVGA board. (I don't like using the "basic" serial port, in case I want to use the serial monitor. The two uses might clash. Megas, I gather, have multiple serial ports available as "standard".) I haven't played with a SerialToVGA on an Arduino (yet), but doubt there is any rocket science involved.
For the general issues, see my introduction to serial comms. From there, there is a link to the details of what you need to use an Arduino with SerialVGA. That's couched in general terms, for driving the SerialVGA board just read "SerialVGA" for "PC", and don't worry about the voltage level shifting issues. That page also give you a links for a way to drive the SerialVGA from a PC, and there's almost certainly a Lazarus alternative to the Delphi answer given. In the case of this second essay, sending things, by serial comms, TO an Arduino from a PC, you would read "SerialVGA board" for the "Arduino" in the essay. Or, you could just use something like PuTTY. You need to deal with the voltage levels issues, if sending from a PC to the SerialVGA board.
With a Teensy 3.0 or 3.1, here's the deal....
One way to drive the SerialToVGA board is as follows....
Download AltNewSerial.zip from....
https://www.pjrc.com/teensy/td_libs_AltSoftSerial.html
(I know... I hate add-ons, too... but this is probably worth it.)
I don't know the PROPER way to add to your Teensy setup. While writing this 26 Nov 14, I'm using a Teensy 3.1, Win7 and Arduino 1.0.6 and Teensyduino (Teensy Loader) 1.20.
Before the next step, I created a AltNewSerial folder in my....
C:\Program Files (x86)\Arduino\libraries\
.... folder.
I just opened up the .zip with the basic Windows Explorer, and dragged copies of...
AltSoftSerial.cpp
AltSoftSerial.h
... and the folder...
config
... from the .zip archive into the newly created...
C:\Program Files (x86)\Arduino\libraries\AltNewSerial
===
Right! Tedious "do it once" stuff done.
Here's how to use SerialToVGA and AltNewSerial in a Teensy. Similar code (different pins) for Arduino, but you have to tell the NewSoftSerial which pins to dedicate to the job. (Use this link to jump back to what I said about NewSoftSerial, and serial comms, in general.)
With a Teensy 3.0 and 3.1, for the Easy Answer, just use pins 21 and 20 for transmitting from the Teensy/ receiving to it, respectively. ("Pin 21" being the one also known as A7.) (You won't be able to use PWM 22 while using AltNewSerial. (What? You want your cake AND to eat it??)
Plug your SerialToVGA into your microprocessor. Connect a VGA monitor to the standard connector supplied on the interface. Don't worry if you see gibberish on the screen.
===
Here's a REALLY little sketch that has, I think, everything for a VERY CRUDE use of the SerialToVGA. (The one "clever bit" is extracted from material in the SerialToVGA manual.)
/*
  VerySimple SerialToVGA
  (On Teensy 3.1)
  vers 26 Nov 14
  UNTESTED! (In this exact form)
  started 26 Nov 14

  A little "Hello World" program to test HobbyElectronics.co.uk's
    SerialToVGA board.
  This does NOT exercise ANY of the clever things the board can
    do, most notably maintain several windows, all scrolling
    without hassle for programmer. And display in colors.
 */

//If using AltSoftSerial from HobbyTronics.co.uk,
//  in a Teensy 3.0, or 3.1, pins 20 and 21 are
//  used for the hardware serial port... so beware
//  using either for anything else in a program
//  which uses AltSoftSerial


#include //So you can set up an "extra" serial
   // port on a Teensy. See...
   // https://www.pjrc.com/teensy/td_libs_AltSoftSerial.html
   // for a zip with what you need.
//(Use NewSoftSerial in an Arduino. Some other lines may need
//  MILD edits, in this case... but nothing extreme.

AltSoftSerial mySerial;//Set up a serial port for
      //Teensy 3.0, 3.1

void setup()//Built into Arduino/ Teensy. This runs once at start.
{
  mySerial.begin(9600); // Set baud rate for serialVGA board
  vga_command("r"); // reboot VGA board. Blanks VGA screen. Pauses 2 seconds
}//end of setup()

void loop()//built into Arduino/ Teensy. Runs over and over, after setup()
{
    mySerial.print(" Hobbytronics Ltd www.hobbytronics.co.uk ");
    delay(150);//Just to make it easy to se what is happening.
}// end of subroutine called "loop()"

/*Below here, code from
  HobbyTronics.co.uk's manual for their SerialToVGA
  board. None of this central to the program's main
  purpose... demonstration of simple digital inputs
  and outputs, and monitoring of the inputs, setting
  up effective control structures.

*/

void vga_command(char *command_str) {
// Function to easily send command to VGA board
mySerial.print("^["); // send escape sequence
mySerial.println(command_str); // send Command string
// Most commands don't take very long, but need a small delay to complete
// The Reboot command needs 2 seconds
if(command_str[0]=='r') delay(2000); // Wait 2 seconds for reboot
if(command_str[0]=='w') delay(20); // Small delay for window commands
// 5ms at 9600, 20ms at 115200
delay(2); // Other commands need a tiny delay
}
That little bit of code should cause....
First the VGA display screen will go blank.
Then a 2 second pause will occur.
And then, the screen will fill with "Hobbytronics Ltd www.hobbytronics.co.uk ", repeated over and over and over.
The second instance just follows on from the end of the first. Line wrap is automatic. The text scrolls up if you try to go "down" when you are already at the bottom of the page. All the "messy" bits Just Taken Care Of For You.
====
And, as I said... the device is capable of multiple windows, colors, etc. Hurrah!
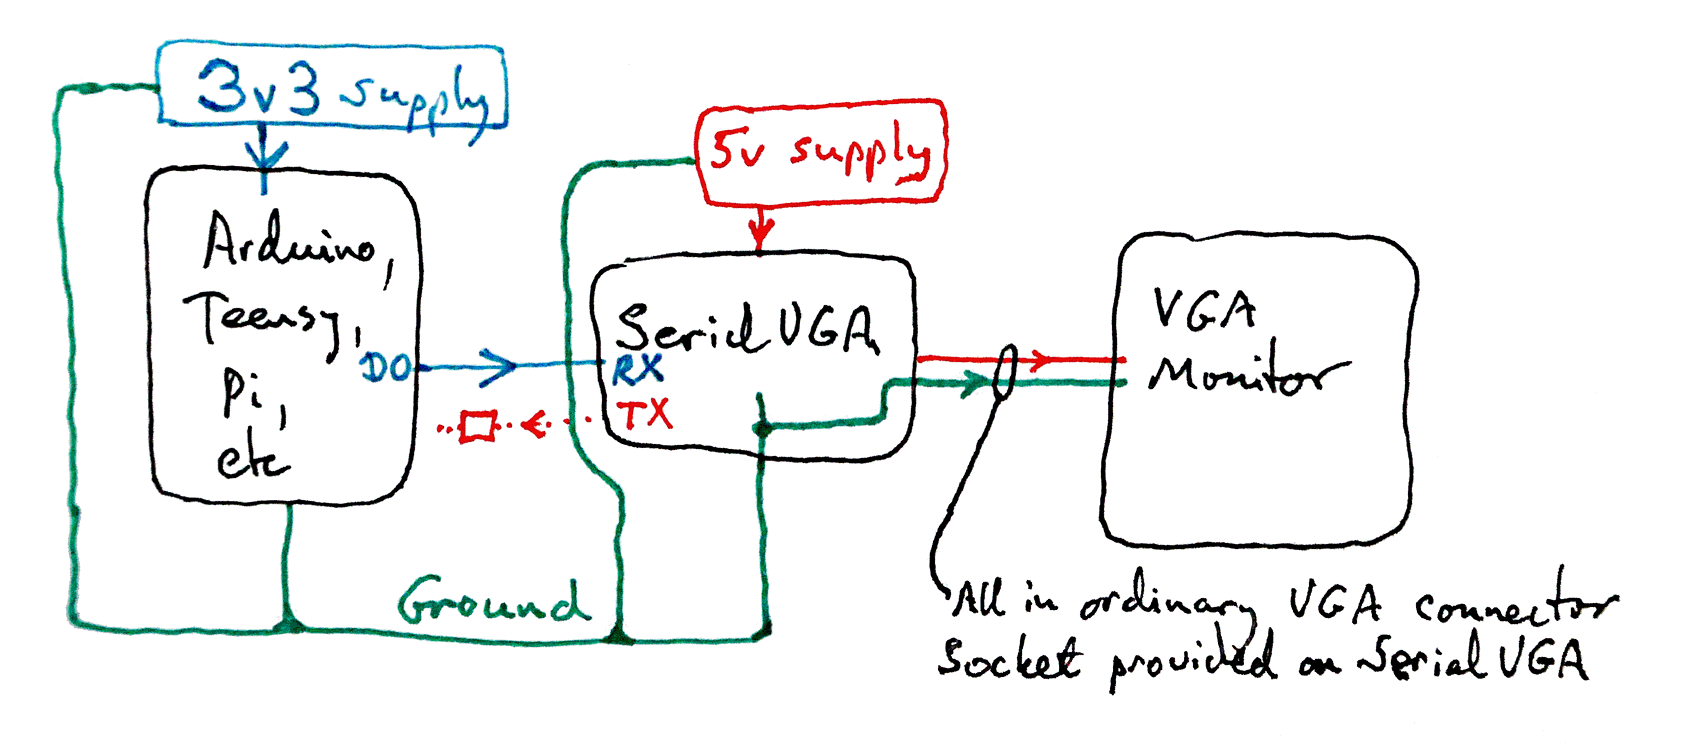
You run your system on its usual 3v3 supply. Of course, your external supply may deliver a greater voltage, if you are using a system with onboard voltage regulation. Both your system and the supply must be connected, in the usual way, to the overall ground.
The SerialVGA module needs a regulated 5 volts. And the grounds need connecting, as the Arduino and Arduino supply were connected.
Newbies: Be careful, but not too careful. Yes: The grounds need to be connected together, as shown. Don't worry that the 5v for the SerialVGA board (and the signal to the VGA monitor) will "leak" into your 3v3 electronics. Voltage just doesn't work that way. Nor will the whole thing work if, in particular, the connection between the ground coming out of the "bottom" of the SerialVGA module is not connected to the ground coming out of the bottom of the Arduino, Teensy, Pi, Whatever. (I.e. the bit of wire under the word "ground" in the diagram.)
The "connection" between the SerialVGA module and the VGA monitor doesn't require any effort from you. The module has a normal "VGA" socket: You just plug the monitor in, as you would plug it in, say, to a PC. (It actually uses several wires for the data.)
The serial data you must send from the Arduino (or other) will be a 3v3 signal if the Arduino is one of the 3v3 Arduinos. Not a problem. I've marked the Arduino end of that wire "D0" for Digital Out. (You could... but would be unlikely to... use PIN D"zero". I am not saying you should. That's a D followed by the letter "oh", and I am speaking in generic terms.)
I've marked the other end of that wire "RX" (for "receive"). That is the marking on the SerialVGA for the place the wire needs to go. It is an input to the SerialVGA, fed by an output from the Arduino. (Yes, Impatient Reader, I know you know... but it is a stumbling block for some newbies.)
Now... and i don't want to go too far with this one... but...
In the diagram, there is a dotted red line from the "TX" hole on the SerialVGA module headed off towards the Arduino. And there is a resistor drawn on the line. (But I don't know it if simply goes in serial like that, or whether you need a voltage divider. And I certainly don't know the right value(s) for the resistor(s). But there are clever things you can do with the SerialVGA, and it does have an output. But I'm not experienced with 5v to 3v3 interfacing, and don't want (yet!) to use the SerialVGA's output, so, for this, you are on your own. I'm told by those who would know, that it is a simple matter of a resistor or resistors to feed the 5v output to the 3v3 input.
When I first heard of this board, I went looking for alternatives... and didn't find much. Maybe it is a too-specialized product? Or maybe people either didn't realize all the neat things they could do, if they had one, or didn't dare to hope that someone had done the development work?
Eventually, someone at the Arduino Forum pointed out an alternative, the "MicroVGA". I've written a SerialVAG vs MicroVGA.
Yes! You can, with care, have two Teensys hanging off one PC. Just be careful with the Tools/Settings/Serial Port setting! Suppose you have Teensy "A" running some program well. And you (think you) are working with Teensy "B", hanging off a different USB port of the same development machine as Teensy "A" is being powered by. And then you reprogram... you hoped... Teensy "B". If the Tools/Settings/Serial Port setting is wrong, you will have just wiped out the program you had in "A". Sigh. But you have it backed up, don't you? And with luck, you won't have a hardware/software clash. (I.e. a pin with an input strongly asserted high in the external circuits, but programmed as an low output by your software. Oops. Oh well. There are lots of other pins you can use.
![]() Page tested for compliance with INDUSTRY (not MS-only) standards, using the free, publicly accessible validator at validator.w3.org. Mostly passes. There were two "unknown attributes" in Google+ button code, and two further "wrong" things in the Google Translate code. Sigh.
Page tested for compliance with INDUSTRY (not MS-only) standards, using the free, publicly accessible validator at validator.w3.org. Mostly passes. There were two "unknown attributes" in Google+ button code, and two further "wrong" things in the Google Translate code. Sigh.
....... P a g e . . . E n d s .....