Make your computer speak? For $25 +p&p (8/10). How cool is that? And it can say anything! (More on that later. You can even give discrete boxes of bits speech capabilities... the device I'm going to talk about can operate in a stand-alone mode after being programmed on a big computer.
You do it with a "SpeakJet", which I purchased from Sparkfun. Later in this page I will tell you how to control it.
Don't let the "messy bits", the breadboarding which I cover next put you off. Read past the hardware setup to see how much fun you can have with the thing for the slight "hassle" of setting up the hardware. At the end of this article are details of a PCB, if you want to go that route.
Besides the SpeakJet, you need a very few simple bits and pieces you can pick up at Radio Shack, and a speaker or a fancier audio system. I used a powered speaker set which is normally plugged into the "line out" socket on my laptop.
Will your computer sound like Anthony Hopkins? No. (You can, up to a point, give it a British accent, though!) It will sound very like the synthetic speech of the Cambridge University physicist Stephen Hawking, who endures his motor neurone disease in such an inspirational way.
The "bits and pieces" are as follows:
If you don't want to go the powered speaker route, a 120 ohm speaker may be suitable. Or go online for a circuit. There's one with some other notes on the SpeakJet on Droidbuilder's Let's Make Robots blog.
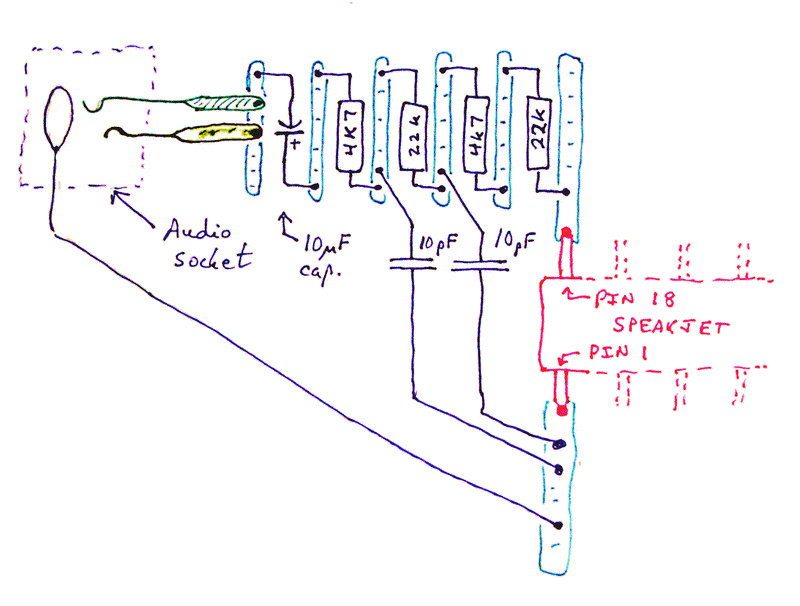
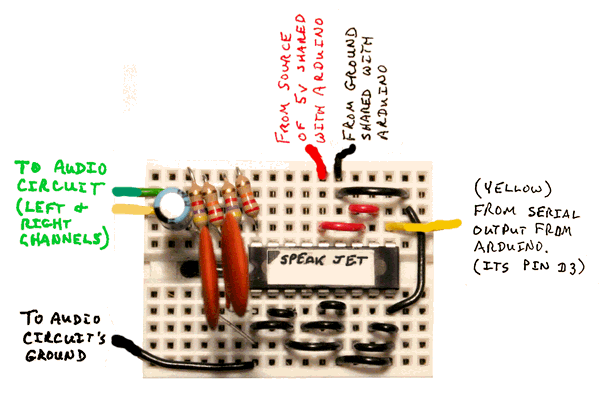
What's on the left hand end of the breadboard is perhaps hard to see in the photo. I hope the above diagram helps. Would 22k resistors be okay? I would imagine so. I added the 4k7 resistors just because I wasn't sure, and they cost next to nothing. (the Sparkfun datasheet calls for 27k resistors.)
This page is some way from being finished. But it shows you all you need to know to get started with the fun of the SpeakJet.
For a basic setup, as pictured above, you tie almost all the pins low. (This accounts for ten of the 20 pins.) Supply 5v to pins 11, 12 and 14. Send TTL (not RS-232) 9600 baud serial data in on pin 10. Leave pins 15, 16 and 17 connected to nothing. You connect pin 18 to the positive side of your audio circuit. (And the audio circuit's ground must connect back to the SpeakJet's ground, of course.) (There's a diagram in the excellent SpeakJet User's manual.)
I am driving my SpeakJet with an Arduino, but any source of TTL level serial data will do. If you don't happen to be using an Arduino as the processor driving the 4 character LED display, fear not... much of the material here will still be useful to you. (But look into Arduinos! They are inexpensive and... dread word... "powerful". And very developer-friendly.)
A word about that TTL level: You can't just plug a SpeakJet into the serial port of your PC. If you are driving the SpeakJet from a 5v Arduino or other 5v microprocessor, one of your digital outputs will probably be fine. (Will be fine, if you are using an Arduino. I think everything will still work at 3.3v, too. If you've used a SpeakJet with a 3.3v processor, please confirm?)
If you are not into microprocessors, you can still have fun with SpeakJet's, but you'll need a level shifter. Not a big deal. The Wulfden PA4B is a nice unit. I have a page for you about these issues, and it gives a link to the Wulfden site. Even if you plan to use your SpeakJet mostly with microprocessors, you might want to connect it to your PC sometimes, to take advantage of the great, free, "Phrase-A-Lator" software the nice people at SparkFun make available to us. That is a Windows app, and would be something a school might consider... "playing" with the SpeakJet would teach users a lot about phonetics.
Remember: Once programmed (via Phrase-A-Lator, or otherwise), the SpeakJet can be used in isolation.
But most readers will, I suspect, be wanting to control it from something like an Arduino, so how do we do that?
I'm glad you're not paying me for the advice here. It would be embarrassing to take your money for the following. Using the SpeakJet is incredibly easy.
As usual, I made things more complicated than they are.
If you want the device to "say" "Hello", then almost all you have to do is send it 183,159,146,164. That will in fact work... but you'll get a pretty poor "Hello". We'll come back to getting a good "Hello" in a moment. For now, let's look at how to send the SpeakJet 183,159,146,164, and why that produces a crude "hello"
ALL you need to do to make it say "Hello" is send it the numbers I cited. If you have read the datasheet, don't worry about "putting it into serial mode" first.
You can get your SpeakJet confused. A simple power cycle will usually cure things. If you have accidentally (or otherwise) changed the baud rate, that persists across power cycles. You can also "detune" the device, another action which will persist across power cycling. I don't know what that means... but there's stuff about it in the datasheet. Don't do it! Remember that resetting the microcontroller which is controlling your SpeakJet is not the same thing as resetting the SpeakJet.
So... how do we send the numbers. In general: As 9600 baud serial data. You can just send it with no hardware handshaking. This is simpler. You may have to tell the sending device to worry less... it may be waiting to send the second number because it wants a "handshake" to confirm arrival of the first. (I think the SpeakJet can do handshaking... but I didn't want to figure it all out. I was sending my data from an Arduino, and didn't want the extra hardware overheads.
TO GO HERE.... Arduino program for sending crude "hello". It will be something like....
//ArdD xxxx
//ver xxx Aug 10
//Speakjet demo- Simplest "Hello"

//Started 15 Aug 10

//See Sparkfun.com... product code 9578
//http://www.sparkfun.com/products/9578

//xxEDITConnect one of the above modules to an Arduino with
//xxEDITjust  wires:
//5v (Vcc)
//"GND" (ground)
//Q-EDIT REST OF THIS SECTION....nd a wire from
//XXthe "Rx" pad of the module... the MODULE is receiving
//XXit's commands through this... to the pin you choose to
//XXTRANSMIT data out from the Arduino on.
//XXIf you use D3, then nothing below needs a change.
//XXIf you use a different pin, then change the....
//XX#define SerOutFrmArdu...
//XXline.

//When you run the program, you should hear a poor
//"hello", once, each time you restart the Arduino

#include <NewSoftSerial.h>
//Yes, NEWSoftSerial...
//I don't think SoftwareSerial has the "available()"
//function, does it? Not needed here, but might as
//well stick to one library for all work with extra
//serial lines.

#define SerInToArdu 2//no ; here. Not used in this demo,
//  but in defining mySerialPort, we to designate some pin
//  for the serial data into the Arduino
#define SerOutFrmArdu 3//no ; here. The pin that serial data
//  will go out from the Arduino on. Beware "Rx"/"Tx"
//  "gotcha": The Arduino's "Tx" (transmit) will go to
//  the connected device's "Rx" (receive)

NewSoftSerial mySerialPort(SerInToArdu,SerOutFrmArdu);
//  The above creates the serial channel we will use.

void setup(){

pinMode(SerOutFrmArdu,OUTPUT);
pinMode(SerInToArdu,INPUT);//Not actually needed... put in
   //to be explicit as to data direction over serial lines

mySerialPort.begin(9600);

//Changing the string of numbers here changes what the
//  Speakjet says, as explained below. The following will
//  generate "Hello", in a low pitched voice, at moderate volume
char SayIt[] = {20, 96, 21, 114, 22, 88, 23, 5, 183, 7, 159, 146, 164,
0};
//The 0 at the end is there to tell "print" we've reached
//the end of the stuff to be said. THUS YOU CAN'T USE A
//ZERO IN THE STRING OF THINGS TO BE SENT... not if you
//want to send them this way.

mySerialPort.print(SayIt);
};//end "setup()"

void loop(){
//nothing, for this very crude program
};//end "loop()"
As I said... that should give you a crude "hello". I'll come back to how I knew what numbers to put in the string later. If you haven't read the comments in the code, do so now, especially if you are going to use an Arduino to send the numbers to the SpeakJet
Those numbers stood for....
If you want a good "Hello" out of your SpeakJet, send it 20, 96, 21, 114, 22, 88, 23, 5, 183, 7, 159, 146, 164
(I will tell you where these codes are coming from!)
(If you want your SpeakJet to sing, use the table of note frequencies at Wikipedia in conjunction with the 88 command. Try....
bN=137//Put these in "variables" to make wholesale changes easy
//137 is the "ow" sound
dB=4
//Inject a short pause between notes.. don't make it zero, if
//using the code above to send the string.

20,96,21,10,22,140,23,8,//Setup
22,146,bN,bD,//first note
22,164,bN,bD,
21,2,22,130,bN,bD,
bD,bD,bD,
22,65,bN,bD,
21,1,22,98,bN,bD,
0
....for a bit of fun.)
Enough fun! Back to work!
We can't put off "Where do the numbers come from" any longer.
There are two answers.
The first is for wimps... takes all the "fun" out of things, but leaves you in the dark, depending on mummy. And you have to install something on your big machine. And it is only available for Windows. "It" being the rather splendid "Phrase-A-Lator". (The link will download a .zip file, with a Setup.exe program for you. If you download that, you don't need to download the SpeakJet dictionary separately, as the dictionary is installed with the Phrase-A-Lator)
With the Phrase-A-Lator, once you et to grips with it, you can type "hello" into the "dictionary" edit box at the lower left of the phrase editor, click "load overwrite", and...
\HE \FAST \EHLE \LO \OWWW
... will appear in the "Say Data" memo. Click "View Codes", and a box will pop up with "20,96,21...". Superb!
Backtracking for a moment: What were those \HE \FAST... codes? They're ANOTHER way of saying what the phonetic elements of "hello" are.
Hang in there... we're getting to the end of this.
We'll come back to Phrase-A-Lator in a moment.
Your other choice is the excellent table on page 16 of the excellent SpeakJet user's manual. Once you've become accustomed to it, and are no longer over-whelmed, you will see that there's a line for code 183. The table tells us that's for the "HE" sound (same "codes" used by Phrase-A-Lator), and that it is the "Voiceless Fricative"(!), 70ms long (when, I think, you have the speed set to 114), the "h" sound found in "Help, Hand, and Hair". (If you want a slightly different "Hello", try using 184, the H in "Hoe, Hot, Hug"!)
NOW you see where to find the codes?
Connected with the Phrase-A-Lator is a file called PhraseALator.Dic. You can open this in a text editor, and if your do, you'll find about 1400 words given in "SpeakJet" codes, i.e. the "\HE \FAST \EHLE \LO \OWWW" we saw earlier for "Hello". It is useful in trying to make new works, or just in learning how the system works. I was trying to make my SpeakJet say "Bob" (never did get a particularly good result!), and found "cob" in the dictionary. That of course was a good starting point.
What about the speed, pitch, etc codes? The are listed in the user's manual on page 15. The run from 0-31. You can't send 0s, if you use the Arduino code as presented above. You don't want to send 16 or 24 to 127 until you know more... but I don't think you can precipitate disaster if you do, by mistake. You may have to cycle the power to t e SpeakJet, though. Code 31 might be one that you might want to use.
The "dangerous" operations of changing the chip's baud rate or de-tuning it takes more than mere codes, I believe. (It's in the manual.)
A diversion: Wait 'til you try codes 128 to 254. Wild and wacky! A pretty good sonar ping (252), pistol shot (253), C-3PeeOh beeps (200-262), light sabre noises ("alarms":210-219), a full set of DTMF codes (240-251).
But back to work!...
When you use the Phrase-A-Lator, it sticks a few of the special codes in front of the essential phoneme codes. It sticks volume, pitch, etc codes in ahead of the phoneme codes, and the occasional "play it fast", etc, in just before specific phonemes. (There are a bunch of codes, like the one for "fast" which only affect the next (singular) phoneme's delivers, as opposed to the pitch, speed, etc, codes which are of the "until further notice..." type.
If you connect your SpeakJet to your computer... NOT DIRECTLY.... but through a level shifter, as discussed earlier, you can have a fabulous time playing with the Phrase-A-Lator. you build a phrase, click "Say it", and the SpeakJet speaks your phrase! Now that's what I call a fun peripheral. And as I said before, I think every elementary school should have one, and let kids "learn (about phonetics) by doing". The costs and risks are well within the limits of schools... the technical competence to set it up, show the kids what to do will be the problem. (And lack of "can be bothered"). Sounds like a contribution an interested parent could "inflict" on a school!
Okay... I couldn't resist. If you mess something up trying the following, don't blame me!!!... but I was successful....
I wanted to try direct control of my SpeakJet from my Windows PC. Yikes... it is only as I type this that I realize that I was playing with my expensive FTDI USB-to-Arduino cable. I thought I was using my Wulfden BUB. Oh well... got away with it!
I unplugged the USB-to-Arduino cable from my Arduino. (That cable incorporates the hardware to create a virtual serial port, via the computer's USB). Unplugged my SpeakJet from my Arduino... only 3 wires after all, 0v, 5v, data.
Pushed the three wires from the SpeakJet into the Arduino end of the FTDI cable, and, almost (details in a moment)... it worked! I could run my SpeakJet directly from my PC, using the free Phrase-A-Lator. COOL! No more "build phrase, copy to Arduino code, upload code, run Arduino program" cycles! Type "Hello world" into the Phrase-A-Lator phrase editor's "Dictionary" edit box, click "Load Overwrite", click "Say It"... and the SpeakJet DID! (Rendering of "world" a little disappointing.) (It gets better... I'll come back to that.)
So... those "little details": I had to go to the little dialog which arises when you start Phrase-A-Lator, and tweak the "Communications Settings". Put "3" in the serial port edit box... your Arduino cable may be on a different port, remember. Took tick out of "Use Flow Control". Clicked "Test Serial Port". Got a green back-ground behind the 3 for a moment. (Goes red, and stays red if test fails. Goes white again after momentary green, which makes sense, if you think about it.) Phrase-A-Lator remembers your needs from session to session, by the way. Classy bit of software!
Remember I said that YOU are responsible for what you do to your computer... but here's how I plugged the wires in...
SpeakJet   FTDI cable socket
  GND        1
  5v         3
  Data       4
I have called the FIRST socket of the connector on the end of my FTDI cable "Socket 1". That's the end of the connector with... on my cable... the black wire. (By the way... don't get caught. Again, on MY system, my Arduino-clone (A Modern Device RBBB) has "G", for "Ground" at one end of the pins the connector goes on. And with my FTDI cable the connector should be pushed onto the pins with the BLACK wire going to the pin with the "G". "Of course", you say? My cable happens to have a *G*reen wire at the other end of the connector.... Sigh. Ah well, if it were easy, would it be as fun?
The "Gets Better": With your SpeakJet connected to Phrase-A-Lator directly, you can just click on any phoneme, any sound effect and hear it immediately. If you hover over a button, you get the list of words which exemplify the sound. If you double click, it is added to the phrase you can build in the "Say data" memo. Hooked up like this, I bet it is very easy to pass strings of "make this sound" commands to the SpeakJet... there's an "EEPROM Editor" option as you enter the program.... an adventure for another day, me-thinks.
So! I hope that will inspire you to give this fun device a try? I haven't covered using it as a stand-alone device. In a nutshell: It has some EEPROM. You store the phrases of your choice in the SpeakJet, and then use some of those many pins that, above, we just tied low. They get connected to momentary switches (or microprocessor outputs) tied high (or low, depending). When the switch changes the state of the SpeakJet input, a phrase gets "spoken". If you have a page with details of this use of the chip, similar in spirit to the page you are reading, contact me, I'll probably give your page a link. Other contact also welcome!
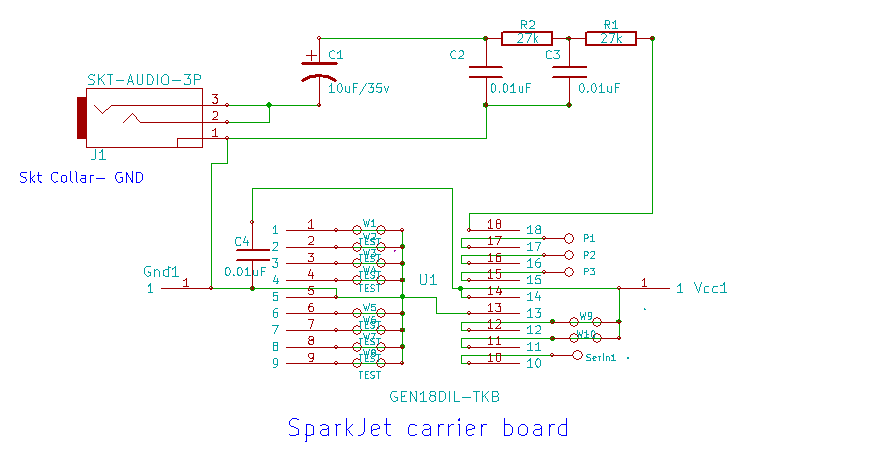
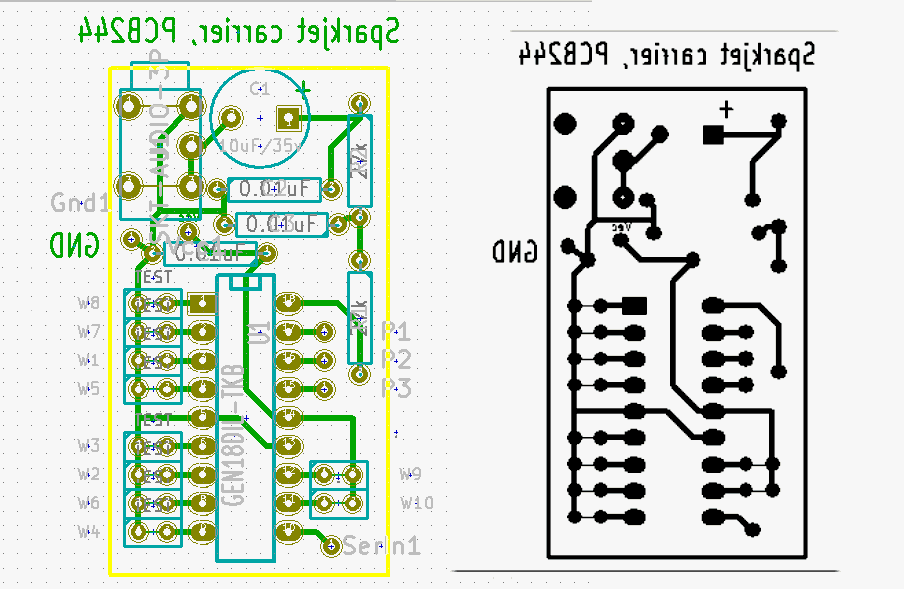
If you would rather mount your Speakjet on a PCB, that's an option too... if you can make your own. You are welcome to use my very basic design. It is available in machine readable form for the excellent free multiplatform KiCad.
The design is about as simple as it could be. You only need three wires from the PCB to your Arduino... 5v, GND, and the serial link, for the commands from the Arduino to the Speakjet. The PCB merely copies what was described above. You will plug it into some speakers- with- amplifier of the sort sold for plugging into PCs. I have provided pads to allow you to access pins of the Sparkjet which I haven't yet used, in what I've written up above, so it will be easy to take your Sparkjet adventures further.
The Sparkfun datasheet suggested 27k resistors. I didn't have any. I started with 33k resistors, but the sound wasn't very loud. Changed them to 10k resistors. All seemed okay, still.
The actual KiCad files are better than what you see below, of course, but to save you the trouble of fetching the files before you have any idea of what would be in them....
![]() Page tested for compliance with INDUSTRY (not MS-only) standards, using the free, publicly accessible validator at validator.w3.org
Page tested for compliance with INDUSTRY (not MS-only) standards, using the free, publicly accessible validator at validator.w3.org
....... P a g e . . . E n d s .....