Here's a map!...
What do you think? Do you like it?
Okay, I admit, the map hasn't got very far yet... but what's here shows how to make one with as much detail as you want to put in.
(This is part of a big set of pages from one source about making maps... including challenges for individuals and organized groups like school classes, youth groups (e.g. the Scouts) and adult bonding adventures.)
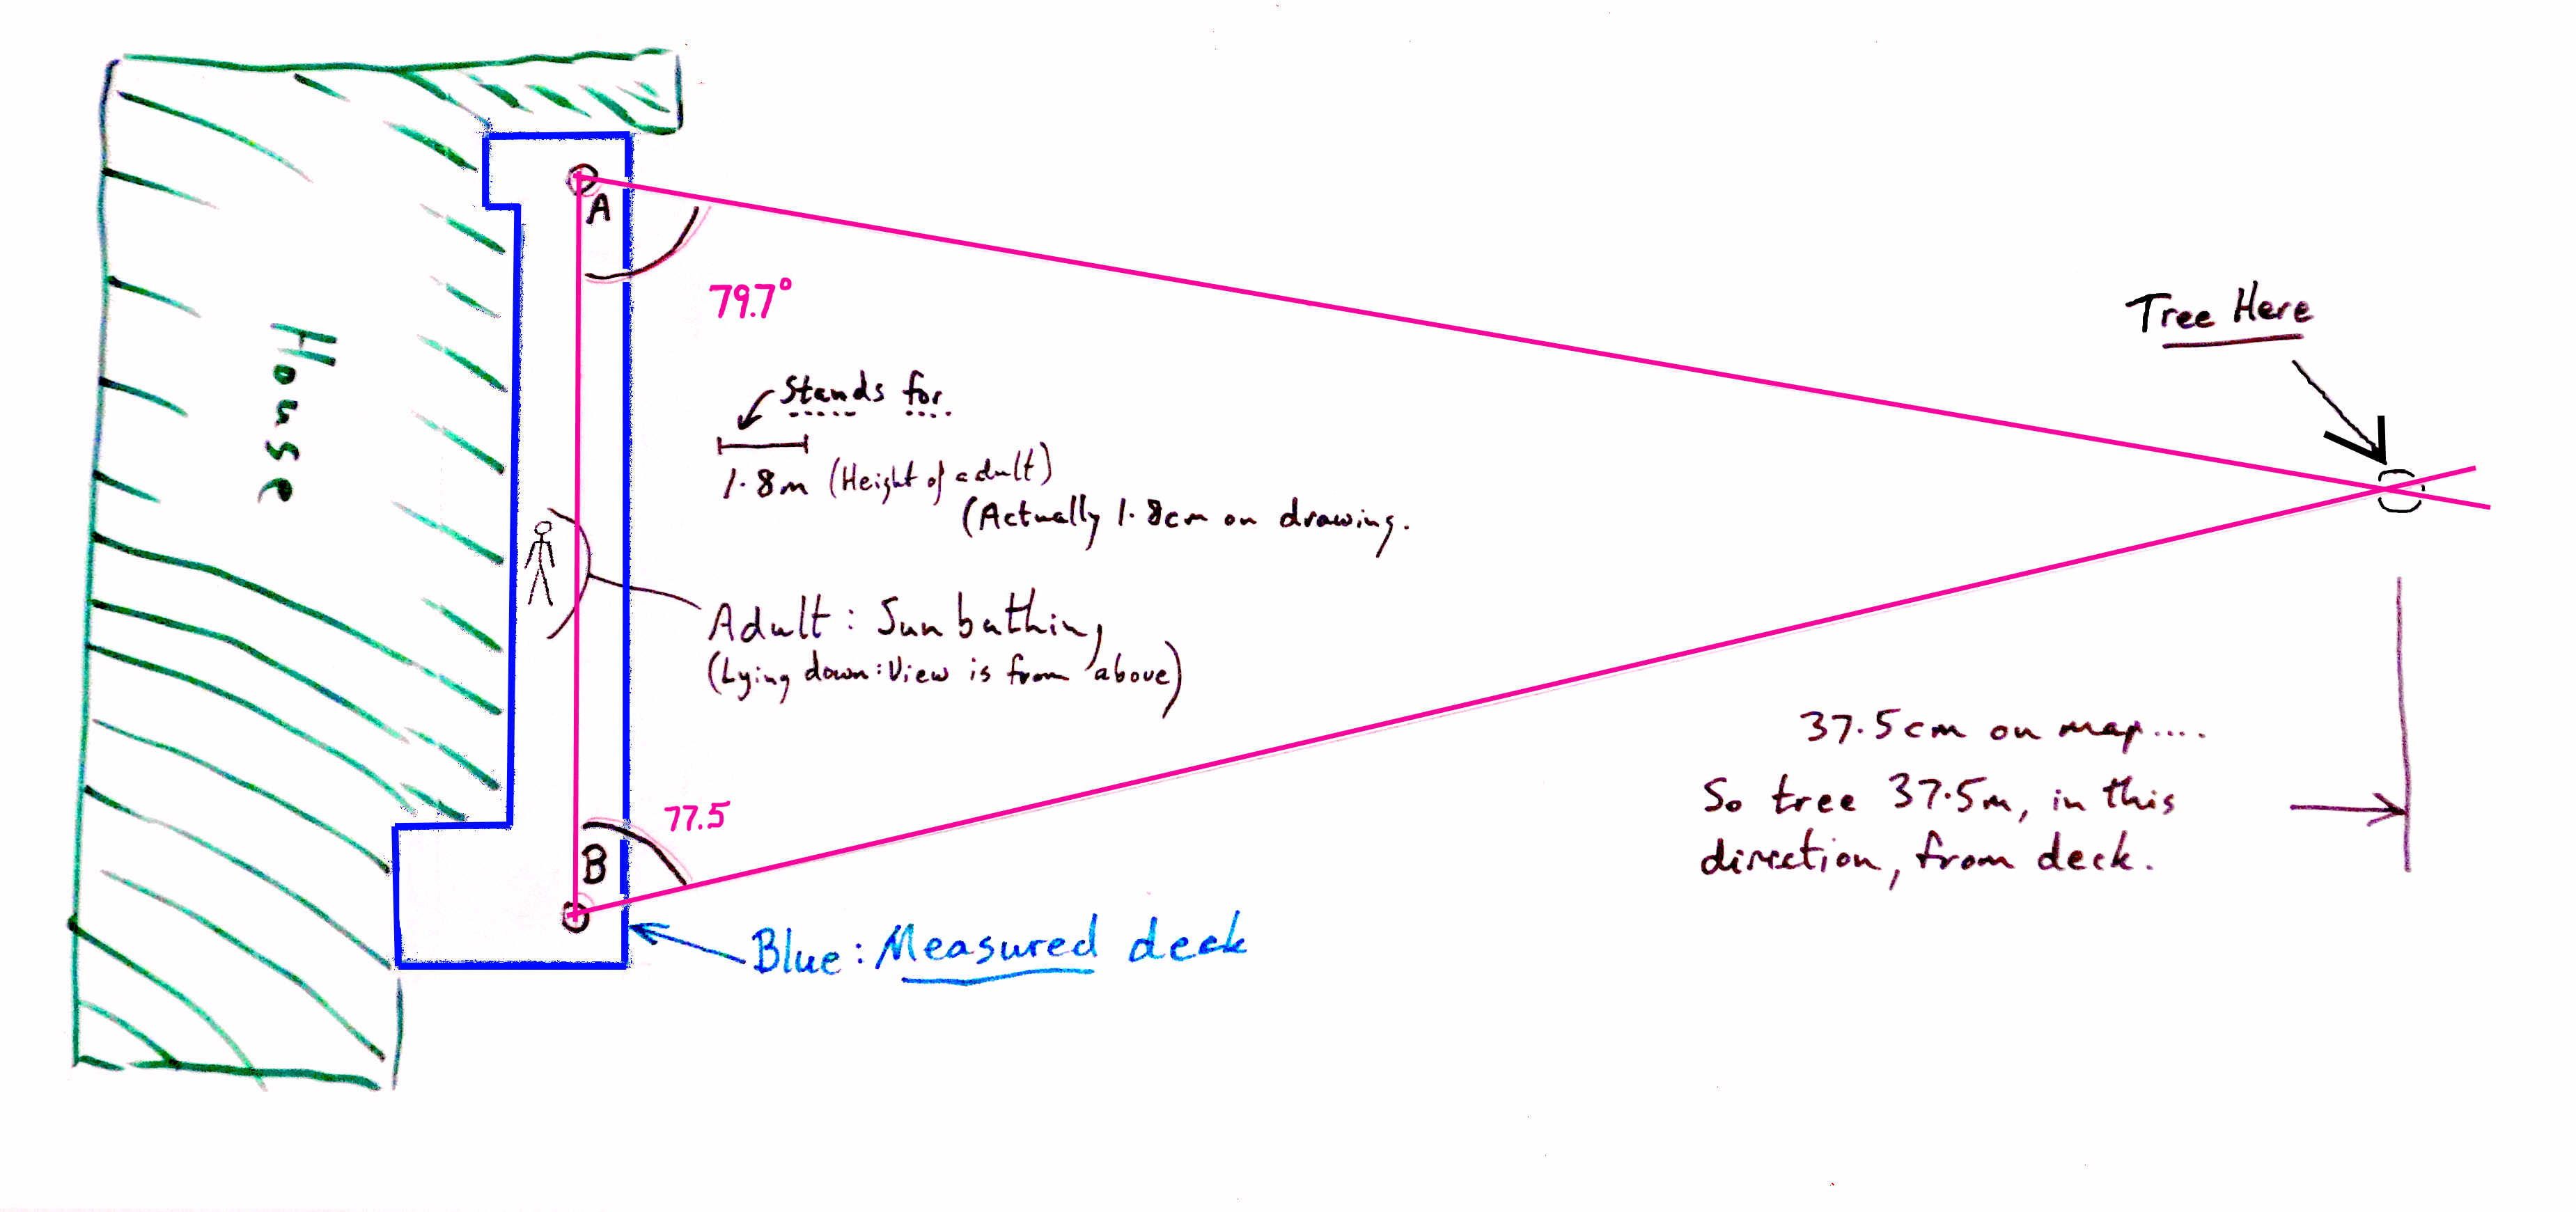
The map shows, with the blue line, the outline of the deck on the back of a house... accurately. (The house is approximate)
We mapped the deck one (rather boring) way.
But we also have a tree on our map !!!! In the right spot, relative to the deck, and everything! And we did that without going near the tree!
All will be revealed.
The map is drawn in the usual way, with North at the top.
To draw our map of the deck, we started at the southwest corner... down at the "bottom" right. Where it says "Blue: Measured deck".
We measured clockwise around the deck...
The south end was 4.6 meters long. Then we went 2.8m north. 2.2m east. 13.2m north. 0.7m west. 1.5m north. 3.0m east. By then we were at the north eastern corner of the deck, and just had the long "run" south, back to where we started.... 17.5m
We had what we needed for a map of the deck! All we had to do was decide a scale. We decided to make one centimeter on the map stand for 1 meter in real life.
We drew our map of the deck (in blue). We drew in the rest of the house very roughly (in green).
We drew a stick figure to show the scale another way. Of course, the map being a view from above, normally, you would just see the tops of people's heads, and their shoulders. So we had the "person" we were putting in "lie down" for going on our map.
There's another guide to making maps this way available from the same author (me). I'm not sure which is "better". If you are hating the one you are reading now, go there immediately! If not, at least skim the rest of this page, but consider skimming the other after that. (There's another link to it at the bottom of this.) (And links for contacting me on both pages... I'd be very grateful for your views on the strengths/ weaknesses of the two.)
Back to what I was saying....
Yeah, well. You can make maps like that if the thing you are mapping has nice 90 degree corners, and it isn't too big.
How do people make more interesting maps?
One point at a time.
They choose two "starting points". If you don't mind having to add bits of paper, they can go anywhere on the page. How far apart you put them determines the scale of the map.
We'd already started a map. We had the deck on it. And we'd chosen 1cm stands for 1m for our scale.
For the clever way of making maps, we were going to make spots on the deck our two starting points. Each was 1m back from the deck rail, 1m from the deck end. You can see these two points marked in on our map as "A" and "B". Find them on the map now... be sure you know where they are.
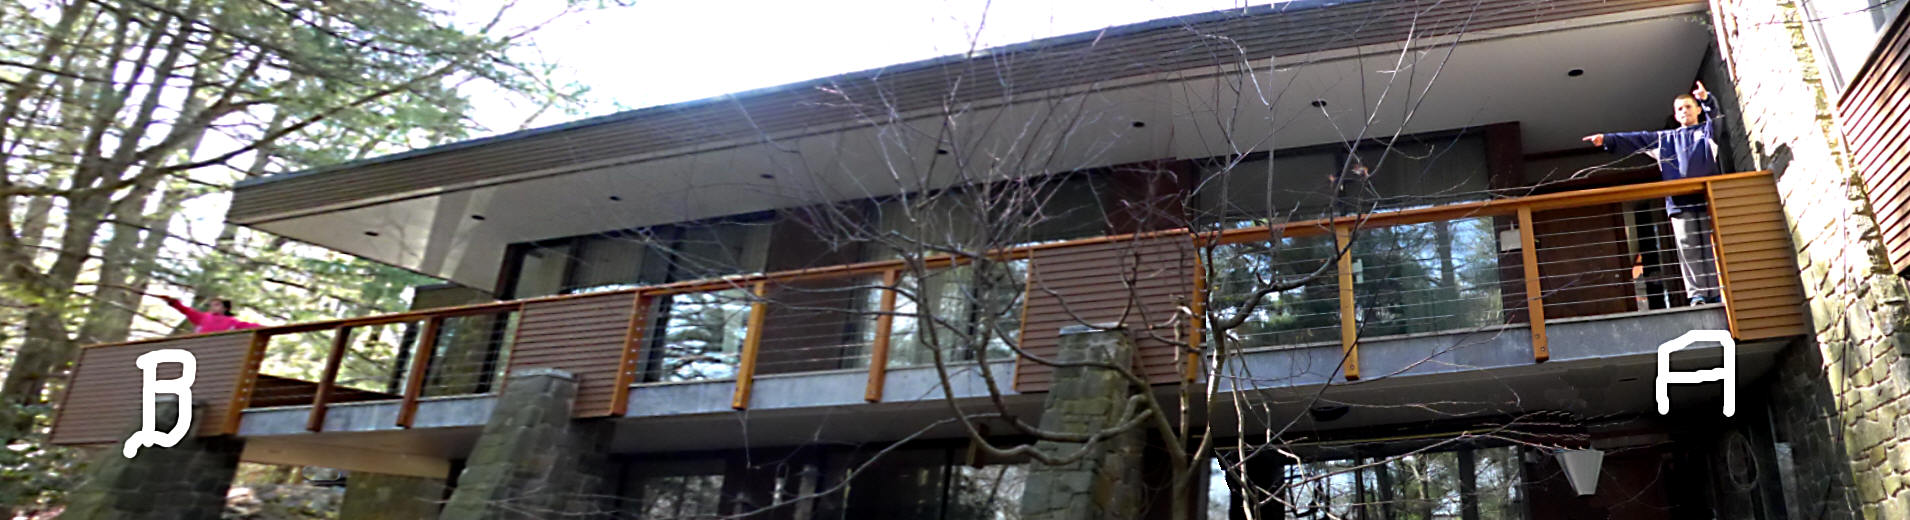
Here's a picture of Susan and Jonathan standing on the deck. Susan is at "B", at the south end of deck, on our left as we look towards it from the east. Jonathan is at A.
Big deal.
Well... patience. You've got to understand all this to understand the fun bit.
So far....
Still in the boring stuff: We know where A and B are by easy things.
Now the Good Bit. There's a tree with a raccoon nest in it in front of the house. We're going to put that on the map without leaving the deck.
Okay... our "map" will be pretty limited! A deck, and a tree.... but we could add more things by the same technique.
What technique??
Susan and Jonathan put their arms out. The pointed one arm at each other. The other arm they pointed at the raccoon tree.
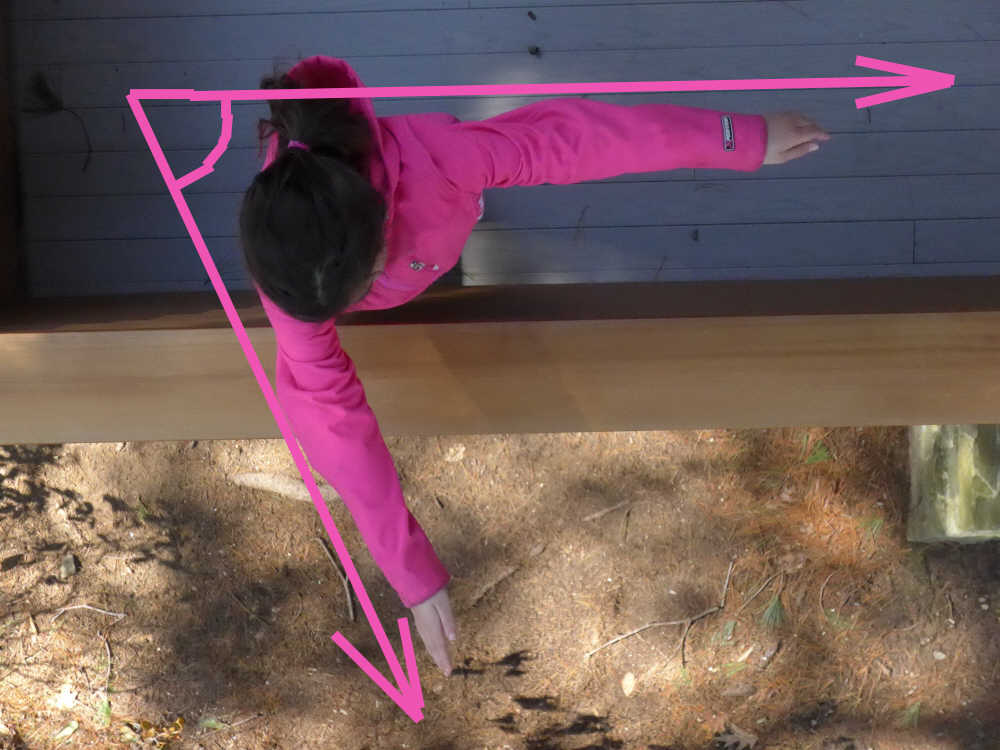
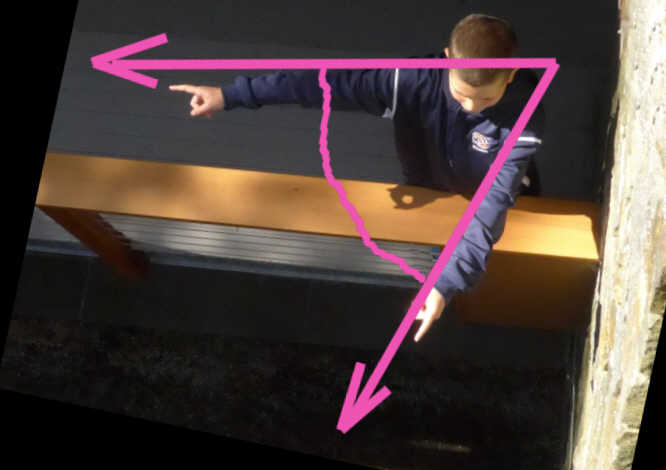
Now, of course "the angles" weren't measured from the photos above. (Other pages here tell you about how such angles are measured) But I hope the photos make clear WHAT angles were the essential ingredient to putting the tree on the map?
Here are the two angles we needed....
1) B to A to Tree (the one made by Jonathan's arms) was 79.7 degrees. Look for the pink "79.7" on the map. It is marked near "A", which is where Jonathan was standing
2) A to B to Tree (the one made by Susan's arms) was 77.5 degrees.
Once we had those two angles, we could draw the angles in on our map.
For the first one, we started at B (Susan), drew a line to A (Jonathan). Then we got a protractor, and used it to see what direction we needed to be going when we left A to make the angle B-A-Tree 79.7 degrees... Which would show on our map what we had measured as The Way Things Are in the real world.
At this point, we couldn't tell quite how long to make the line from the deck to the tree. We knew the tree was EXACTLY in that direction from A... but we didn't know how far.
Not a problem. We'll fix that in a moment.
The we drew in Susan's Angle... the one that her arms made.
We already had the line from A to B, one side of Susan's Angle. Again, we used a protractor to see what direction we needed to go from Susan to be headed towards the tree.
Ah ha!.... the tree must be on the "Jonathan-to-tree" line, AND it must be on the "Sarah-to-tree" line.
There's only one point on the whole page where the two lines touch. Where they cross ("touch") is where the tree must be on the map.
Until we had drawn the tree in on the map, we couldn't tell how far it is from the deck. Remember: All of this was done from the deck. But! Now that the tree was marked on the map, we could measure the distance, on the map, of the tree from the deck. It turned out to be 37.5cm. From that, knowing our map's scale, we know that the tree is 37.5 meters from the deck. Pretty cool. Really.
For a "proper" map, we would only need to repeat the business of measuring two angles (one from A, one from B) over and over and over again. From the deck, you can see a flagpole, a steeple, a place where a small bridge crosses a brook. You'd do the "two angles thing" for each of them, draw each of them in on the map. When you'd put in enough features, you'd have a "proper" map. But it only requires some hard work, not any further clever tricks.
(There's nothing different there. I just thought it would be a pain to have to scroll to the top of the page to see the map again.)
Don't say "Oh, measuring the angles must be hard", as an excuse to shirk trying this, to shirk introducing kids to the ideas.
Yes... you can spend many hours on devising angle measuring tools. This page arose to support pages on that topic! It is a magnificent challenge.
But you don't need a superb theodolite to do what is described above. Yes: The better your theodolite, the better your results will be. But you can start with simpler answers.
The best answer would be one devised by whoever is undertaking the activity!
An easy answer, capable... with a little care... of good results is the plane table. Thinking about what might constitute "a little care" is the sort of thing that makes this activity worth doing. Where are errors coming from? How can they be reduced?
And then there are my pages on a "fancy" home-made theodolite. Fancy does not need to mean expensive! Again... the thrill is in the chase.
The project can be done at any scale. A school playground would be a perfectly viable and worthwhile first effort. Or even a gym, if being outside is an issue. (Put a few "things" at random places across the floor, to be shown on map.) Or, if you live in Denver, you can map the front range of the Rocky mountains across many, many miles.

(There is a much nicer version of that, with more of Denver included.)
As I said at the top of this, there's another guide to making maps this way available from the same author. I'm not sure which is "better". I'd be very grateful for your views on the strengths/ weaknesses of the two... contact details below.
I also offer other pages, starting at my main "mapping" page, about other aspects of the science and art of mapping.
The "main mapping" page STARTS with yet an another alternative to this page... probably not as good. What do you think? But don't miss!!... at the bottom of my main "Mapping" page there is a bunch of links to more "maps" pages, not just making them... lots of aspects.
Another set of links to pages about map-making by me is in my Flat-Earth-Academy "Geography Department" page.
Apologies for the current tangle! (^_^)
Creating this was a lot of work. Wasted work, if no one sees it. Please tell people it is here?? The following is just another way to reach this page, but is easier to remember, easier to pass on, than "http://www.arunet.co.uk/tkboyd/MappingArms.htm", I hope. "MakeMYmap", note... not "MakeYOURmap". And all one word. All in lower case works, but I write it with the upper case letters starting each word to make where "makemymap" comes from more clear.
Search across all my sites with the Google search button at the top of the page the link will take you to.
Or...
Search just this site without using forms,
Or... again to search just this site, use...
The search engine merely looks for the words you type, so....
*! Spell them properly !*
Don't bother with "How do I get rich?" That will merely return pages with "how", "do", "I", "get" and "rich".
I have other sites. My Google custom search button will include things from them....
One of my SheepdogGuides pages.
My site at Arunet.
The page's editor, Tom Boyd, will be pleased if you get in touch by email.
![]() Page has been tested for compliance with INDUSTRY (not MS-only) standards, using the free, publicly accessible validator at validator.w3.org. Mostly passes.
Page has been tested for compliance with INDUSTRY (not MS-only) standards, using the free, publicly accessible validator at validator.w3.org. Mostly passes.
AND passes...
